Wednesday, June 6, 2012

creamy cheesecake with raspberry sauce

 I made a cheesecake! My first, actually.  I had a hard time deciding what recipe I wanted to use, so I grabbed a random recipe book (which ended up being Better Homes and Gardens) and looked it up! But that one looked just alright so I looked at the newer version of it, and it looked like it would be absolutely delicious, which it was.


(Better Homes and Gardens New Cook Book, page 284, Cheesecake Supreme)
            
Cheesecake:
Prep: 30 min  Bake: 40 min  Oven: 375ºF  
Cool: 2 Hours  Chill: 4 Hours  Makes: 12 slices

1 1/2 cups finely crushed graham crackers
1/4 cup finely chopped walnuts
1 Tbsp. granulated sugar
1/2 tsp. ground cinnamon (optional)
1/2 cup butter (1 stick)
            3 8-oz packages cream cheese, softened (3 heaping cups)
                             1 cup granulated sugar
                                2 Tbsp. all-purpose flour
                             1 tsp. vanilla
                             1/4 cup milk
                              3 eggs, slightly beaten
                                        1/2 tsp. fine lemon zest (optional)
                                               1 recipe raspberry sauce (given below)


Preheat oven to 375ºF. for crust, combine crushed graham crackers, walnuts, the 1 Tbsp sugar, and, if desired, the cinnamon.  Stir in melted buter. 


Press the crumb mixture onto the bottom and about 2 inches up the sides of an 8 or 9 inch springform pan. (I used 8 1/2 inch); set aside.  I had a hard time getting the crust that far up the sides without leaving holes in the bottom of the crust, but it eventually worked out.


For filling, in a large mixing bowl beat cream cheese and the 1 cup sugar with an electric mixer until creamy.  Then add and mix the flour and vanilla until combined.  Beat in milk until smooth.  Stir in eggs and, if desired, lemon zest.

Pour filling into crust-lined pan.  Bake for 40-45 minutes for the 8 inch pan and 35-40 minutes for the 9 inch pan.


While the cheesecake is baking, you can start on the sauce. Now I didn't do mine until the day after because I didn't have time to do it that night, but that doesn't really matter. Anyways, it was really good. Again, I had issues with picking out which recipe to use when I finally said, screw it. I'm smart. I'll make up my own! And so I did. 
8 oz Raspberries (or other berries I suppose would work as well)
1/4 cup granulated sugar 
(I added 1 Tbsp towards the end and regretted it because it ended up being too sweet.)
1/4 tsp. honey
1/2 tsp. cornstarch
1/4 tsp. lemon zest

The first thing you will want to do is obviously to wash the berries. 
Put them in a food processor (I used a blender) until well, processed so it looks like just a bunch of berry goop.  
If you like seeds, then great. If not (I don't), You can pour the berry goop into a small holed strainer and let the juices come out that way leaving the seeds inside the strainer as shown below.  Make sure the strainer is above the pan you will use to cook the sauce in.  This will actually take a little bit of time because you will need to use a spatula to kind of push the berry juice out past the seeds and then scrape underneath the strainer as well.  
Put the saucepan on the burner over medium low heat and add the sugar, honey, cornstarch, and lemon zest.  Stir mixture until it starts to bubble.  


Take it off the burner and let it cool.  As it cools, the puree will begin to thicken and become more sauce-like.  By this time, the cheesecake should be at least almost done. (This sauce is good warm or cold.)  


When the cheesecake is done, there will be a 2 1/2 inch area around the outside edge that will appear set when slightly shaken.  


Cool in pan on a wire rack for 15 minutes.  Using a small sharp knife, loosen the crust from pan sides; cool cheesecake completely on rack.  Cover and chill at least 4 hours before serving.  If you like the sauce warm, heat it up in pan until the desired warmth.


 Serve with raspberry sauce and enjoy!!!


Thursday, May 31, 2012

banana cream pie


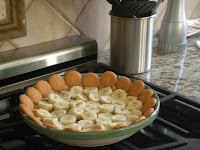
So I don't know if any of you know this, but I nanny for my job, and today Erin and I made a banana cream pie! I'm not gonna lie, it was pretty dang good.  It is super easy and fun to make. if you wanted, you could totally change it up to fit your preferences.  

end result :)

ingredients:
- oversized pie pan
- 1 box vanilla wafers 
- 1/3 cup butter
- 4-5 bananas
- 2 boxes vanilla or banana pudding (you could also do a homemade pudding if you would rather, which I haven't done before, but I might try one of these days)
- 1 cup whipping cream
- 2 tsp. powdered sugar
- 1 tsp. vanilla
(or instead of whipping cream, powdered sugar, and vanilla you could use canned whip cream. and also, the measurements for the whip cream are very unexact.  I usually just estimate and so you might just want to play around with it.  but those are the three things you will need for it.)


directions:
The first thing you will want to do is to make the pudding because it will take a while to cool down, which is what you want.  So either follow the directions on the box or the recipe for your own pudding.  After that is done, stick it on a hot pad in the freezer so it can cool down asap.


The next thing is the crust.  Preheat the oven to 375ºF.  Crush vanilla wafers a few at a time until you have 1 1/2 cups of crushed wafers.  Melt the butter completely and then stir the wafers and butter together until completely incorporated.  Press the mixture into the pie pan until it is crust-like. Put the crust into the oven for 5 minutes and then take it out to cool completely.  


If desired, you can put whole wafers along the side of the pie pan as well.  As soon as the crust and the pudding has cooled down (or the pudding is at least getting to the point where it is cool) you can start layering.  
bananas
half of the pudding
bananas
the rest of the pudding
broken bits of vanilla wafers


let the pie chill for a couple hours


For the whip cream, just combine the whipping cream, powdered sugar and vanilla and beat on high until it can form peaks.  You will know when it looks like whip cream.  Cut up the pie, slather on some whip cream and enjoy!!!


deep dark chocolate cookies

Okay, so I couldn't wait until later to post my first one.  Now I didn't make this just now, but it is definitely a good recipe that I made not too long ago.  Besides, my first recipe needs to be chocolate because that is just the way it is.  Now these cookies arent just any ordinary cookies.  They are dark chocolate perfection where you need a glass of milk with it.  My dad described them as a candy, which I can see where he got that.  They are GLUTEN FREE because there is no flour or butter, which is pretty cool if you ask me.  There IS a whole lot of chocolate, which again, is awesome.  They are so intense, its insane.  They are super gooey and yummy if you eat them warm or at room temperature, and fudgy if you eat them cold. so whatever floats your boat will be good!!  I got this one from pinterest (as many of my recipes will be from), which is amazing.


Just as a side note, the dough is delectable. 

umm dont these look absolutely heavenly?!

Deep Dark Chocolate Cookies
taken from: www.divine-baking.com


Nonstick vegetable oil spray (pam or something like that)
1 1/2 cups bittersweet chocolate chips (about 9 ounces), divided - i didnt have bittersweet, so i used semisweet, and it was still delectable.  but to keep the gluten free going, bittersweet is essential)
3 large egg whites, room temperature
2 1/2 cups powdered sugar, divided (The other 1 1/2 cup is to coat the dough in, you don't need as much as it says.)
1/2 cup unsweetened cocoa powder
1 tablespoon cornstarch
1/4 teaspoon salt


Preheat oven to 350°F. Spray 2 large baking sheets with nonstick spray. Melt 1 cup chocolate chips in glass bowl in microwave, stirring twice, about 2 minutes. Cool slightly.
Using electric mixer, beat whites in large bowl to soft peaks. Gradually beat in 1 cup sugar. Continue beating until mixture resembles soft marshmallow creme.
Whisk 1 cup sugar, cocoa, cornstarch, and salt in medium bowl to blend. On low speed, beat dry ingredients into meringue. 


Add the lukewarm chocolate and 1/2 cup chocolate chips (dough will become extremely stiff).  Place 1/2 cup sugar in bowl. Roll 1 rounded tablespoon dough into ball; roll in sugar, coating thickly. Place on prepared sheet. Repeat with remaining dough, spacing 2 inches apart.  Bake until puffed and tops crack, about 10 minutes. Cool on sheets on rack 10 minutes. Transfer to rack; cool.

Yield: Makes about 36
Preparation: 30 minutes
Total time: 50 minutes


wish me luck!

So this is my first post ever! I know everyone probably has a post like this in the beginning where there is nothing of substance really, but I'm really excited nonetheless. This one doesn't have a recipe in it, however, I think I will be making a banana cream pie later today at work, so we will see how that goes.  I will come back today with the details on it! 


Yesterday, I was trying to come up with a name for the blog, and I became stuck.  I am one of those people where once there is something I want to do, I want to get it done right then and there, and so coming up with a creative name on the spot that I would like for a long time suddenly became a challenge.  Eventually I became patient enough to brainstorm. Luckily I came up with a bunch of ideas that had to do with food and asked some of my friends and they agreed with me on my favorites.  I came back today and came up with an entirely different one that I really liked so I just went for it without anyone else's input! Hopefully I will continue to like it and I won't get sick of it.  


Anywhooo, my blog is going to basically just be everything that I bake or cook! I wanted to start a blog, but I had no idea what it would be about and so after some thinking, I figured I could do something casual like this.  It will just be a log for a bunch of recipes and whether or not they were a hit or a miss after I made them. On weeks that nothing new comes up, I will probably post something that I have made in the past so that I won't get out of the habit on coming on here. I love to bake and cook (baking more than cooking, which can definitely be dangerous sometimes) and I'm excited to get started, and wish me luck!